原稿:语雀 · webpack-vue_1:起始 · 原目录:Webpack › Demo › Webpack 搭建 Vue 项目 › webpack-vue_1:起始
项目初始化
创建目录、使用命令初始化 npm,然后在本地安装 webpack 和命令行工具 webpack-cli
mkdir webpack-demo
cd webpack-demo
npm init -y
npm install webpack webpack-cli --save-dev
创建 src 目录放置源文件,创建 src/main.js,可以先写一行代码方便之后测试
// main.js
console.log("hello world!");
在根目录下创建 webpack.config.js 配置文件
初始化 webpack
- 引入插件:html-webpack-plugin,使用该插件后 webpack 就能自动为 index.html 引入新生成的 bundle
- 引入插件:clean-webpack-plugin,该插件可以在每次构建前清理 /dist 文件夹
npm install --save-dev html-webpack-plugin
npm install --save-dev clean-webpack-plugin
修改配置文件
const path = require("path");
const HtmlWebpackPlugin = require("html-webpack-plugin"); // 引入插件
const { CleanWebpackPlugin } = require("clean-webpack-plugin");

module.exports = {
  mode: "development", // 当前模式
  entry: "./src/main.js", // 入口文件
  output: {
    filename: "[name].[hash:8].js", // 打包后文件名,使用8位hash
    path: path.resolve(__dirname, "dist"), // 打包后路径
  },
  plugins: [
      new HtmlWebpackPlugin({
        template: "./public/index.html",
      }),
      new CleanWebpackPlugin()
  ],
};
修改 package.json,添加一条 npm 脚本:“build”: “webpack”,方便直接打包
"scripts": {
  "test": "echo \"Error: no test specified\" && exit 1",
  "build": "webpack"
},
此时执行 build 命令,查看执行结果。如果出现了以下提示,同时生成 dist 目录和其中的 bundle,说明项目初始化成功  | 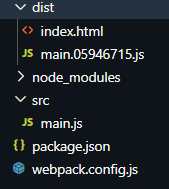 |
loader 与 plugin
挨个引入需要的 loader 与 plugin(html-webpack-plugin、clean-webpack-plugin 在第一步已引入)
样式相关
- css-loader:解析 CSS 文件,包括解析 @import 等 CSS 语法。CSS 文件解析后会以字符串的形式打包到 JS 文件中。但此时样式并不会生效,需要把 CSS 插入到 html 里才会生效
- style-loader:负责把 JS 里的样式代码插入到 html 文件里,通过 JS 动态生成 style 标签插入到文档的 head 标签
- sass-loader:解析 sass/scss 文件
// style-loader 在前 css-loader 在后,css-loader 处理后资源才能被 style-loader 处理
npm install --save-dev style-loader css-loader
npm install --save-dev node-sass sass-loader sass
// webpack.config.js
module.exports = {
    module: {
    rules: [
      {
        test: /\.(css|scss)$/i,
        use: ["style-loader", "css-loader","sass-loader"],
      },
    ],
  },
}
测试,创建 src/style.scss 编写简单的代码
$appColor:red;
#app{
  color:$appColor;
}
在 main.js 引入,执行 build,构建后若输出文件 index.html 成功应用样式,则样式 loader 引入成功
import "./style.scss";

function component() {
  const element = document.createElement("div");
  element.innerHTML = "Hello World";
  element.classList.add("app");

  return element;
}

document.body.appendChild(component());
图片字体相关
这两个 loader 用于优化打包体积
- url-loader :将少于指定大小的文件转换为 base64
- file-loader :将大于指定大小的文件移动到指定的位置
npm install --save-dev file-loader url-loader
// webpack.config.js
module.exports = {
    module: {
    rules: [
      {
        test: /\.(jpe?g|png|gif|svg)(\?.*)?$/,
        use: [
          {
            loader: "url-loader",
            options: {
              limit: 10240,
              fallback: {
                loader: "file-loader",
                options: {
                  name: "img/[name].[hash:8].[ext]",
                  publicPath: "../", //为了防止图片路径错误
                },
              },
            },
          },
        ],
      },
      {
        test: /\.(mp4|webm|ogg|mp3|wav|flac|aac)(\?.*)?$/,
        use: [
          {
            loader: "url-loader",
            options: {
              limit: 10240,
              fallback: {
                loader: "file-loader",
                options: {
                  name: "media/[name].[hash:8].[ext]",
                  publicPath: "../",
                },
              },
浏览器兼容性:babel 相关
babel 可以让将项目的 es6 语法编译成浏览器普遍支持的 es5 语法,但一些新的 api 如 promise 等还不支持转换,需要另一个插件babel/polyfill,但是这个插件会将所有的 polyfill 都打包到 main.js,还需要另一个插件 core-js@2 实现按需加载
npm install --save-dev babel-loader @babel/core @babel/preset-env
npm install --save @babel/polyfill core-js@2
此外 babel 会在每个文件都插入辅助代码,可能使代码体积过大(见文档),使用 @babel/plugin-transform-runtime 插件,将 Babel runtime 作为一个独立模块,来避免重复引入
npm install --save-dev @babel/plugin-transform-runtime
npm install --save @babel/runtime
npm install --save @babel/runtime-corejs2
在根目录创建 .babelrc 文件进行配置
{
  "presets": ["@babel/preset-env"],
  "plugins": [
    [
      "@babel/plugin-transform-runtime",
      {
        "helpers": true,
        "regenerator": true,
        "useESModules": false,
        "corejs": 2
      }
    ]
  ]
}
修改 webpack 配置文件,增加一条 rule
{
  test: /\.js$/,
  exclude: /node_modules/,  \\ 排除不被转码的库
  use: ["babel-loader"],
},
测试,修改 main.js,执行 build
function sleep(delay) {
  return new Promise((resolve) => {
    setTimeout(resolve, delay);
  });
}

async function foo(){
    await sleep(1000);
    console.log("hello webpack");
}

foo()
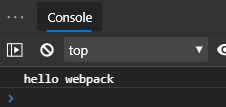
浏览器打开 dist/index.html,如果控制台1s后打印 “hello webpack”,说明成功支持 ES6
Vue 支持
vue-loader 支持对 .vue 文件的加载编译
npm install --save-dev vue-loader vue-template-compiler vue-style-loader
npm install --save vue
配置 webpack 解析,修改 webpack.config.js
- alias 允许在项目中使用路径别名代替复杂的路径
- extensions 会让 webpack 自动查找特定后缀的文件,在项目中引入文件时将不必再书写文件后缀
// 开头引入
const vueLoaderPlugin=require('vue-loader/lib/plugin')
module.exports = {
  plugins: [new VueLoaderPlugin()], // 添加插件
  rules:[{
    test: /\.(css|scss)$/i,   // 增加 vue-style-loader
    use: ["vue-style-loader", "style-loader", "css-loader", "sass-loader"],
      },{
    test:/\.vue$/,                                  // 配置loader
    use:[vue-loader]
  }],
  resolve: {
    //路径别名
    alias: {
      vue$: "vue/dist/vue.esm.js",
      "@": path.resolve(__dirname, "./src"),
    },
    //路径别名自动解析确定的扩展
    extensions: [".js", ".vue", ".json"],
    }
}
接下来创建 src/App.vue
<template>
  <div id="app">
    <p class="hello">{{ message }}</p>
  </div>
</template>

<script>
export default {
  name: 'App',
  data() {
    return {
      message: 'hello Webpack! 😎'
    }
  }
}
</script>

<style scoped>
.hello {
  color: #000000;
  text-align: center;
  font-size: 20px;
}
</style>
修改 main.js
import Vue from 'vue'
import App from './App.vue'

new Vue({
  render:h => h(App)
}).$mount('#app')
热更新
使用 webpack-dev-server ,该插件提供一个简单的 web server,并且具有实时重新加载的功能,不用每次编译代码后运行 npm run build