原稿:语雀 · 代码分离 · 原目录:Webpack › 官方指南学习 › 代码分离
本篇的代码使用 webpack doc:代码分离提供的 demo
什么是代码分离:把代码分离到不同的 bundle 中,然后按需加载或并行加载这些文件。代码分离可以用于获取更小的 bundle,以及控制资源加载优先级,如果使用合理,会极大影响加载时间 |
常用的代码分离方法有三种:
- 入口起点:使用 entry 配置手动地分离代码
- 防止重复:使用 Entry dependencies 或者 SplitChunksPlugin 去重和分离 chunk
- 动态导入:通过模块的内联函数调用来分离代码
入口起点(entry point)
这种方法即在出口起点提供额外的出口,在其中放入要分割的代码
创建 src/another-module.js 后修改配置文件
another-module.js
import _ from 'lodash';
console.log(_.join(['Another', 'module', 'loaded!'], ' '));
webpack.config.js
const path = require("path");
const HtmlWebpackPlugin = require("html-webpack-plugin");
const { CleanWebpackPlugin } = require("clean-webpack-plugin");

module.exports = {
  mode: "development",
  entry: {
    index: "./src/index.js",
    another: "./src/another-module.js",
  },
  plugins: [
    new CleanWebpackPlugin(),
    new HtmlWebpackPlugin({
      title: "Development",
    }),
  ],
  output: {
    filename: "[name].bundle.js",
    path: path.resolve(__dirname, "dist"),
  },
};
这种方法下
- 如果入口 chunk 之间包含一些重复的模块,那些重复模块都会被引入到各个 bundle 中。比如 index.js 和 another-module.js 中都引入了 lodash
- 这种方法不够灵活,并且不能动态地将核心应用程序逻辑中的代码拆分出来
防止重复(prevent duplication)
入口依赖
配置 dependOn option 选项,这样可以在多个 chunk 之间共享模块:
下面这段代码将 lodash 作为共享模块,避免重复添加。如果要在一个 HTML 页面上使用多个入口时,还需设置 optimization.runtimeChunk: ‘single’
  entry: {
-    index: './src/index.js',
-    another: './src/another-module.js',
+    index: {
+      import: './src/index.js',
+      dependOn: 'shared',
+    },
+    another: {
+      import: './src/another-module.js',
+      dependOn: 'shared',
+    },
+    shared: 'lodash',
  },

+  optimization: {
+    runtimeChunk: 'single',
+  },
尽管可以在 webpack 中允许每个页面使用多入口,应尽可能避免使用多入口的入口,这样在使用 async 脚本标签时,会有更好的优化以及一致的执行顺序。 | 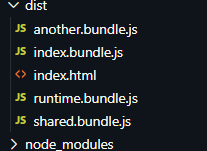 |
SplitChunksPlugin
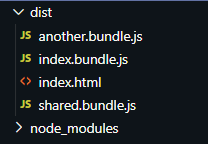
SplitChunksPlugin 插件可以将公共的依赖模块提取到已有的入口 chunk 中,或者提取到一个新生成的 chunk。
修改配置文件的 optimization
  optimization: {
    splitChunks: {
            chunks: 'all',
     },
  },
执行 build,此时 index.bundle.js 和 another.bundle.js 中已经移除了重复的依赖模块。插件将 lodash 分离到单独的 chunk,并且将其从 main bundle 中移除,减轻了大小。
动态导入(dynamic import)
webpack 提供了两个类似的技术以支持动态代码拆分
第一种,也是推荐选择的方式是,使用符合 ECMAScript 提案 的 import() 语法 来实现动态导入
第二种,则是 webpack 的遗留功能,使用 webpack 特定的 require.ensure
import 语法
首先还原配置文件,移除掉多余的 entry 和 optimization.splitChunks,移除 src/ another-module.js;接下来修改 index.js,不再使用 statically import(静态导入) lodash,而是通过 dynamic import(动态导入) 来分离出一个 chunk:
function getComponent() { return import("lodash") .then(({ default: _ }) => { const element = document.createElement("div"); element.innerHTML = _.join(["Hello", "webpack"], " "); return element; }) .catch((error) => "An error occurred while loading the component");}getComponent().then((component) => { document.body.appendChild(component());});
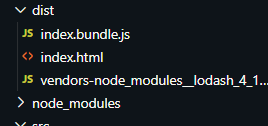
执行 build,此时 lodash 被分割到一个单独的 bundle
import() 会返回一个 promise,因此它可以和 async 函数一起使用,简化代码
async function getComponent() {
  const element = document.createElement("div");
  const { default: _ } = await import("lodash");
  element.innerHTML = _.join(["Hello", "webpack"], " ");
  return element;
}

getComponent().then((component) => {
  document.body.appendChild(component());
});